
How to Make a MOD
Please download the MOD kit for the Announcements section of the Capitalism Lab – Modding forum
Then extract the MOD_kit.ZIP file to the Capitalism Lab folder, resulting in the creation of a folder named “Capitalism Lab\Mod Kit“.
If you are not sure where your Capitalism Lab folder is located, you may right-click on the Capitalism Lab program icon on Windows and select “Properties”, then select “Open File Location” to open the Capitalism Lab program folder.
In the “MOD kit” folder, you will find two subfolders:
1) The “Data” folder which contains moddable data files.
2) The “Images” folder which contains moddable image files.
The “DATA” folder
The data are in DBF format and can be edited using OpenOffice. OpenOffice can be downloaded www.openoffice.org for free.
When you open a DBF file, OpenOffice will ask you to choose the Character Set for the DBF file, if you are using European language characters or any non-English characters, make sure that you select “Unicode (UTF-8)”. If you are only using English alphabetic characters, then you may choose either Unicode (UTF-8) or the default “Western Europe (DOS/OS2-850/International)”.
Please note that when you edit the DBF file using OpenOffice, the first row contains field definitions and should not be modified. The maximum length of each field is indicated in the field definition. For example, in Companies.DBF, the field definition “FULLNAME, C, 40” indicates that the field is used for storing corporate names and its maximum length is 40 characters.
Companies.DBF – Company names
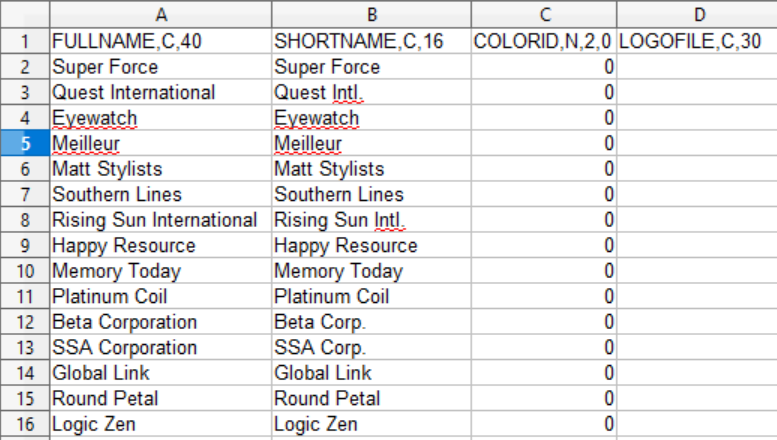
This DBF file contains the following fields:
- FULLNAME – The company name.
- SHORTNAME – The short name for the company, which is displayed when there is insufficient space on the screen for displaying the full name.
- COLORID and LOGOFILE – please disregard them as they are for logos in the legacy format and are no longer used.
To add new records, you could simply enter data on a new row.
Also see: Link AI persons to specific companies
Persons.DBF – Persons
This DBF file contains the following fields:
- NAME – The person’s name
- GENDER – The person’s gender. ‘M’ for Male and ‘F’ for Female
- IMAGEFILE – The image file name of this person. (See the section below about MOD images for more details.)
- CHARACTER – The person’s character.
- 1 – Conservative
- 2 – Moderate
- 3 – Aggressive
- 4 – Very Aggressive
- TRAINING – The person’s expertise on Training
- MARKETING – The person’s expertise on Marketing
- RD – The person’s expertise on R&D
- FARMING – The person’s expertise on Farming
- MFT – The person’s expertise on Manufacturing
- RETAIL – The person’s expertise on Retailing
- RAW – The person’s expertise on Raw Material Production
To add new records, you may simply enter data on a new row.
Product_Names.DBF – Product Names
This DBF file contains the following fields:
- CODE – The product code. Please note that this code is used by the game engine to process the data and you are not allowed to modify it.
- NAME – The product’s original name. This is for reference only and you should not modify it.
- NEWNAME – Enter a new name here if you want to change the product’s name.
Wealthy Persons for The Billionaires 100 List
This DBF file contains the following fields:
- NAME – the person’s name.
- WEALTH – The person’s wealth (in billion dollar)
To add new records, you may simply enter data on a new row.
The “IMAGES” folder
You will find subfolders for modding images of logos, products and person portraits.
The “Products” folder
It contains product images in PNG file format. To mod, simply replace an existing PNG file with a new one. The image size must be 120×120 pixels.
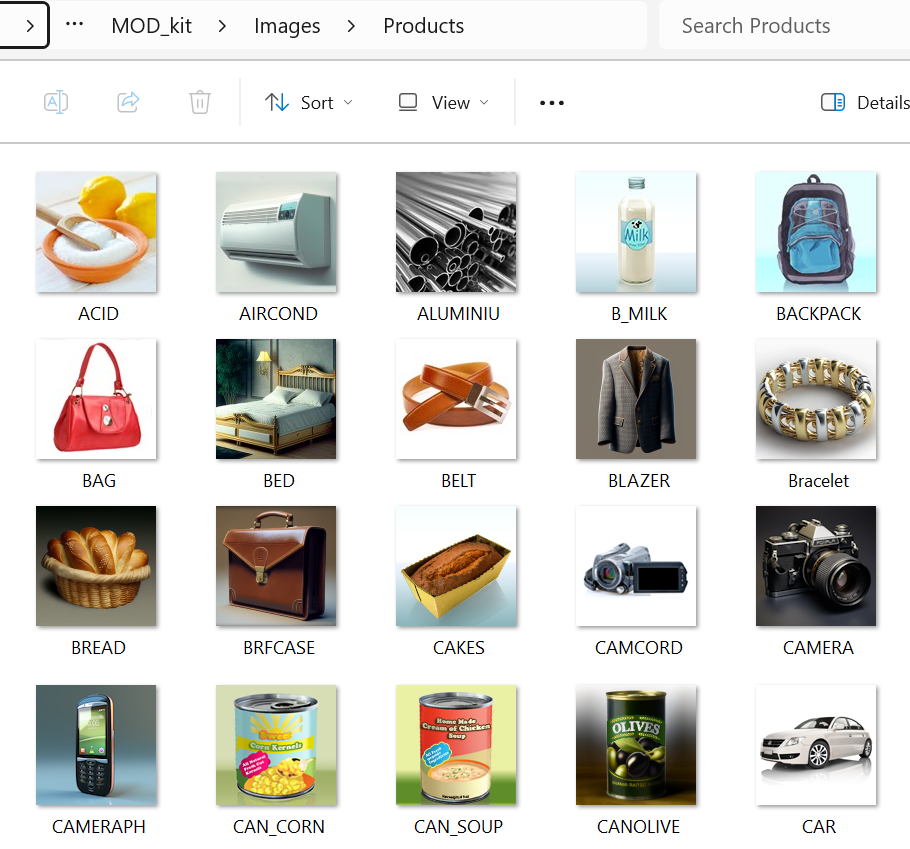
The small versions of the product images are stored in the subfolder \MOD_kit\Images\Products\Small. These small images are used in the 3×3 firm layout.
To automatically generate these small product images from the standard ones, run the make_small_images.bat from \MOD_kit\Images\Products\
Note:
The make_small_images.bat script requires the magick application (part of ImageMagick). You can download and install ImageMagick for free here.
The “Persons” folder
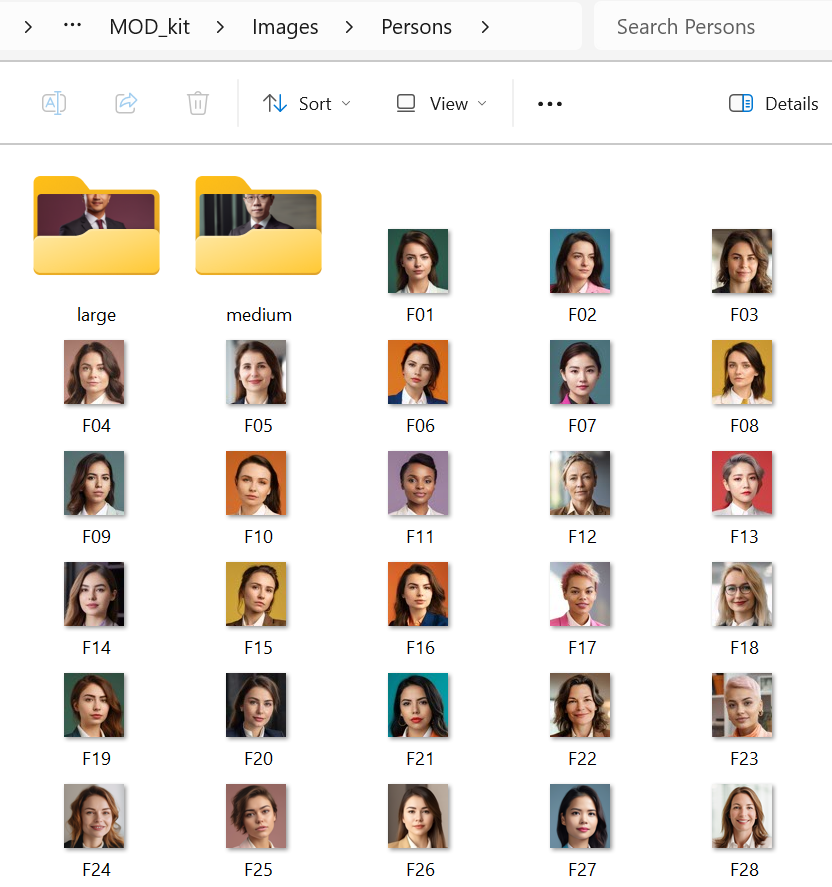
Each person requires 3 images in different sizes.
1) The Persons folder – a PNG image of 60×64 pixels
2) The Persons\Medium folder – a PNG image of 150×160 pixels
3) The Persons\Large folder – a PNG image of 300×320 pixels
The “Logos” folder
Building a MOD resource file
You will find the following files in the “MOD Kit” folder:
PACK.BAT – run this file to pack resource files in each subfolder under the “MOD Kit” folder into a single MOD file.
PACKALL.BAT – run this file to pack ALL individual files in each subfolder under the “MOD Kit” folder into a single MOD file.
CapMod.RES – The resulting MOD file generated by Build.BAT.
The following files are used by Build.BAT only and they are not meant to be used directly by the user:
LibResDir.EXE, LibResXL.EXE, and FileList.TXT
The steps for building a MOD resource file are:
1. Run PACK.BAT or PACKALL.BAT to build the MOD file “CapMod.RES”.
(The difference between PACK.BAT and PACKALL.BAT is that PACK.BAT does not process individual files in subfolders such as IMAGES\LOGOS and you will have to manually run the local PACK.BAT under respective image folders if you have changed any of the image files. On the other hand, PACKALL.BAT will run an extensive list of packing commands that pack every single MOD files but it will take longer time. So if you have only changed DBF files, you should use PACK.BAT instead of PACKALL.BAT to save time.)
2. Copy “CapMod.RES” to <Capitalism Lab folder>\MOD and rename it to a name you prefer.
3. Create a text file to accompany the MOD file. For example, if you have built and renamed MOD resource file from ”CapMod.RES” to “MyMod.RES”, you will have to create the text file “MyMod.TXT” in order for the game to read the MOD file.
The MOD text file should be formatted like this:
[MOD]
Title=<The MOD title>
Version=<The version of the MOD>
Description=<the description text>
Author=<The author of this MOD>
The following are optional lines:
Add Seaport Product=<Product Type>
(Supported in version 3.1.00 or later. You may assign multiple products using the same syntax, like the below example. )
Maximum Product Price=<a value between 20000 and 100000>
(Supported in version 3.1.02 or later. If you intend to create a MOD containing products with standard prices higher than $20000, then you will have to use this statement to set the maximum product price allowed in the game to a value higher than $20000.)
Required DLC=<name of the required DLC>
This specifies the DLC that this MOD requires. If the required DLC is not available, the game will refuse to load the MOD.
The name of the required DLC can be:
- Subsidiary DLC
- City Economic Simulation DLC
- Digital Age DLC
Example:
[MOD]
Title=My Capitalism Lab MOD
Version=2.5
Description=This is my first MOD for Capitalism Lab
Author=Capitalism Person
Add Seaport Product=Steel
Add Seaport Product=Plastic
Maximum Product Price=50000
Required DLC=Subsidiary DLC
Required DLC=Digital Age DLC
4. Create a banner for your MOD.
- The banner image should be in PNG file format.
- The size should be 750 x 125 pixels.
- The file name of the banner should be the same as the MOD file, with “.PNG” file extension. e.g. If your MOD file is called “MyMOD.RES”, then your MOD banner image file should be named as “MyMOD.PNG”.
How to Include a Layout Plan Library File for Your Mod
To provide users with a Layout Plan Library for producing products in your mod, include the .PLO file in your mod’s Zip file. This file should have the same name as the mod’s resource file but with a .PLO extension.
When the player loads the mod for the first time, if it includes a .PLO file, it will be copied to the Capitalism Lab folder where .PLO files are stored, provided the folder doesn’t already contain that file.
For example, if the Magitek MOD’s Zip file contains Magitek.PLO, it will be copied to the Capitalism Lab folder when the player loads the mod for the first time. The player will then see layout plans specific to the Magitek MOD in the game’s layout plan library.